Basically every approach to regular expressions I’ve seen uses the technique of learning all the symbols first, then using that to create various regular expressions. Let’s call that the bottom-up approach. I figured I could add some value by doing it the other way around – by showing specific strategies where regular expressions make sense, showing the regular expressions needed, and then explaining how it works. In other words, the top-down approach.
Once you’ve read this post you should be able to use regular expressions to do pattern matching and extraction in Visual Studio. I’ve kept the number of regular expression meta-characters to a minimum, (hopefully) making it easily understandable as well. You’ll be far from an expert on regular expressions after reading this, but hopefully I can either help get you interested in regular expressions (You should!) or learn some tips about using it with Visual Studio.
I’ve tried to divide the contents into logical sections, so just skip whatever doesn’t sound useful.
On Visual Studio
The built in regular expression support in Visual Studio (2005) is fairly strange – it doesn’t quite follow conventional regular expression syntax, it doesn’t follow the .NET Framework syntax, and irregular behavior has been found. It’s not better that it seems extremely slow once you give it fairly large files either.Besides its drawbacks, it has become the place I use Regular Expressions the most. And trust me, I like using Regular Expressions. So why use Visual Studio? The probable reason is that I use it on a day to day basis, and since it’s not uncommon that I use it for searching, I guess it just became natural to start using it for other tasks as well.
Oh, and by the way: There’s lots of regular expression software out there you should give a try. Free, good software, with somewhat more standards-based meta-characters, probably faster, likely to have more functionality related to regular expressions, and various other improvements.
Enabling Regular Expressions
- Regular expressions are used from the “Find and Replace” dialog
- ”Match case” also applies to your regular expressions
- The "Find in files" "Find and Replace" dialog (ctrl-shift-f) enables you to search only certain file types
- The "Find in files" "Find and Replace" dialog shows all results in the Find window, instead of just finding the next, as with the "Quick Find" dialog.
- The most used regular expression meta-characters are available in the button next to find once you enable regular expressions.
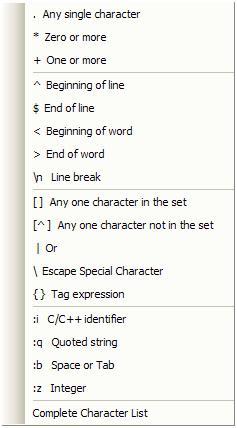
I’ll add the actual dialog Visual Studio displays here just for reference. It describes each meta-character fairly well.
Regular Expression Strategies
General
Ever after learning regular expressions I seem to always find good places to use them. Here’s the list of strategies(or common situations) I’ve covered in this post:- Extract content from lines with a common pattern
- Remove empty lines (optionally with whitespace)
- Remove lines not following the pattern you are looking for
- Add characters around each line
- Retrieve the contents of all lines containing a pattern
Regex strategy #1 - Extract content from lines with a common pattern
Since this is the first example, I’ll walk through this one extra slowlyDescription: You have a number of lines of contents that have some sort of similar text you want to extract.
Example: We have two lines of text, and want to extract the value in the target part of the xml.
<xml target="test" />
<xml info="" target="test2"/ >
Steps:
- Identify a unique string in the lines straight before the content you want to extract
- target="
- Identify a unique string or character on the other side of the content
- "
- The major part of the job is done; just create the regular expression to use the two first points :)
The regular expression we begin with to match the parts we identified above (Don’t test it yet, I’m skipping some important details still):
- target=" [^"]*"
Splitting this up we get three parts: target=", and " are just plain text matching. [^"]* is different though. If we take a look at the picture above, we can recognize two meta-characters:
- [^] – Any one character not in the set
- * - Zero or more
So [^"]* means match a character which is not a ", zero or more times. All regular expressions are greedy by default, so it will try to match as many characters as possible.
To try to show this clearly I will differentiate the different parts of the regex and what it will match by using font styles.
The regex:
- target=" [^"]*"
Will match:
<xml target="test" />
<xml info="" target=”test2"/ >
We’re not quite there yet. First of all we need to escape all non-letter and non-number characters with a \ to make sure they are interpreted as plain text characters. I didn’t do that above as it would have made it harder to understand at first. We get:
- target\=\"[^\"]*\"
Harder to read, but necessary. You’ll get used to it.
We’re now able to match the text we want in both lines. However, we’re still unable to retrieve the information from the fields. To do that we first need to match the entire line, so that we can remove the parts we don’t want. To do that we add .* to the beginning and end of the expression:
- .*target\=\"[^\”]*\".*
The . (dot) is a special character which is interpreted as "Any single character" (Except line break). The regular expression will then read:
- .* - Match as many characters as possible (Up until the (last) target\=\" part of the text
- target\=\" - Match the plain text target=",
- [^\"]* - Match as many characters as possible until we reach a "-character
- " - Match the "-character.
- .* - Match as many characters as possible. (Since this is the last one, it means to the end of the line)
With the above expression we match the entire line. The final part we need is a way of extracting the information we want. We’ll do that by adding { and }. This is basically a grouping construct, and you can have any number of them in your expression.
- .*target\=\"{[^\"]*}\".*
We now have the entire regular expression we need! Let’s test it. Copy the example xml text into a text document and open it in Visual Studio. Open a "Find and Replace" dialog, and add the regular expression. Then add \1 in the "Replace with: " part. \1 means the part you have between your first { and }. In other words:
- Find: .*target\=\"{[^\"]*}\".*
- Replace: \1
The result is:
test
test2
Success! :)
Final comments:
Interested in how the regular expression engine actually does the matching? Let’s see what it matches for each part of the expression, until we reach the final match.
- .* - Match as many characters as possible. This will actually match the entire line. Since the .-character doesn’t match a line break it stops at the end of the line (in other programs with other options, it is possible to make it match line breaks as well.) Remember, it is greedy, so it wants to match as much as possible.
- target\=\" - Match the plain text: target=",. Now, to be able to fulfill this requirement, it has to "let go" of some of the matched characters. So it let’s go of one and one character until it finds that it can match the string. That’s why, if there had been several target="-parts in the line, it would have matched the last one.
- [^\"]* - Match as many characters as possible until we reach a "-character. Match one and one character, until it reaches a "-character.
- " - Match the "-character.
- .* - Match as many characters as possible.
In fact, different regular expression engines do the matching in a different way, but this is all you need to know to understand how it works.
Regex strategy #2 - Remove empty lines (optionally with whitespace)
Description: You have a document with several empty lines you want to remove.Example: : We want to get rid of the empty line between the two words.
SomeText
SomeOtherText
Steps:
- All you really need is the following:
- Find: ^:b*$\n
- Replace:
The meta-characters used here means:
- ^ - Beginning of line
- $ - End of line
- :b – Space or tab
- \n – Line break
When splitting the regular expression into parts it can be read like this:
- ^ - The match must start from the beginning of the line
- :b* - It will be followed by zero or more (as many as possible) whitespace characters.
- $ - The match must end at the end of the line. In other words, the line must contain either no characters or only whitespace characters to give a match.
- \n – Finally we match the line break for the line as well.
This regular expression will match empty lines, including the line break. By replacing them with nothing you get the effect of removing the lines.
Final comments:
Make sure you have a line break after your last line, or it won’t match the regular expression, as the regular expression requires a line break. Optionally you could have appended a * to the \n, making the expression *:b*$\n*. This would have removed the need for the final line break.
Using Excel to sort the data is a good alternative to remove empty lines. That won’t work if you don’t want the data sorted of course.
Regex strategy #3 - Remove lines not following the pattern you are looking for
Description: With the apparent weakness of regular expression matching in Visual Studio, in that you need to replace the entire line to retain the information you want (instead of getting the matches in a separate window), it is not uncommon to get into the situation where you have lines that you need to remove to be able to focus on the lines containing the information you want.Example: We got some more XML, this time with comments we want to get rid of:
<!—xml comment -->
<element>
<!—another comment -->
<subelement />
Steps:
The general strategy here is to do a (preferably) two-step action to
- Mark the lines you don’t want with a special identifier
- Remove all lines with the special identifier
The actual steps:
- Identify a unique string or recurring pattern in the lines you want to remove
- <!
- Write the regular expression to identify and then add the identifier to the line
- Find: ^.*\<\!
- Replace: #\0
- Remove the lines containing the special identifier
- Find: ^\#.*$\n
- Replace:
With point 2, you want to single out all the lines you don’t need (Preferably in one operation, but not always possible). If you have a unique identifier across the entire document, then where you match in the string and add the identifier is unimportant. Often, placing it in the beginning or end of the line is a good starting point.
The first find operation (^.*\<\!) should be easy to read now, as there are no new characters. But for the sake of it: Match start of line, match as many characters as possible until we match the last set of <! in the line.
The replace operation is slightly different. # is the special unique identifier we have used here. It has no special meaning – you could have used an x, or three x-es for that matter, as long as it is unique for the entire line or position throughout the document. Whereas \1 meant the first specified match we found (marked by { and } on each side), \0 holds a copy of the entire line that had a match in it. In effect this means that we simply add a # to the beginning of each line matched.
With point 3, we want to remove all lines with the identifier. So we find each line with the special identifier in the beginning, match the rest of the line with .*$\n, just as before, and then replace it with an empty string.
Final comments:
Another possibility is matching the lines you want to keep, tagging them with the special identifier, and then removing the lines not containing the identifier. Of course you will have to remove the special identifier in the end, so there’s one more replace involved. Not a big thing though.
A third possibility is to use strategy #5 – Retrieve the contents of all lines containing a pattern. This is most useful when you need to match across several documents.
Regex strategy #4 – Add characters around each line
Description: At times I seem to end up in the situation where I have lines of information that I need to surround with information or characters.Example: We have a number of lines of information which need to be used in an SQL in-query as strings, and thus need the necessary surrounding characters. The SQL query is: SELECT * FROM something WHERE name in (…). For those unfamiliar with SQL syntax, we want to add a ‘ to the left of the expression and ‘, on the right side. The information:
Test1
Test2
Test3
Steps:
As long as none of the lines involved already has the necessary characters and no characters that will invalidate the statement, all we need to do is:
- Find: ^.*$
- Replace: ‘\0’,
The find simply matches everything on each line, from start to end character.
The replace puts our plain text characters on each side of the expression. The result is:
‘Test’,
‘Test2’,
‘Test3’,
You’ll need to remove the last ,-character yourself, and paste it into the SQL query, making it:
SELECT * FROM something WHERE name in (‘Test’,
‘Test2’,
‘Test3’)
Final comments:
Another common usage is creating SQL inserts. The logic is just the same; just add some other information around.
Regex strategy #5 - Retrieve the contents of all lines containing a pattern
Description: You want to get the contents of all lines matching a certain pattern, either because the lines make sense for themselves, or because you want to do further work on the lines. This can of course be for one or multiple documents.This is an alternative to using strategy #3 (Removing lines not following the pattern you are looking for). Strategy #3 is probably faster when you work on a single document.
Example: Reusing a previous example contents. This time we want to retrieve all of our XML-comments:
<!--xml comment -->
<element>
<!--another comment -->
<subelement />
Steps:
- The regular expression needed to find the correct lines aren’t really the important part here, as what we wan’t to show is how we go from there. We don’t even need to use a regular expression in this case, just search for <!--. The important part here is to do this search in the “Find in Files”-dialog (ctrl-shift-f). The results listed should be:
- C:\aPath\file.txt(1): <!--xml comment -->
- C:\aPath\file.txt(3): <!--another comment -->
- Now copy the results from the “Find Results”-window and paste them into a document.
- We need to remove the path information. Use the following:
- Find: ^[^\:]*.[^\:]*.
- ^ - The match must start from the beginning of the line
- [^\:]* - Match zero or more (as many as possible) non-:-characters.
- . - Match the :-character
- [^\:]*- Match zero or more (as many as possible) non-:-characters.
- . - Match the :-character
- Replace:
- Find: ^[^\:]*.[^\:]*.
- Now we remain with only the lines we’re interested in.
Where do you go from here?
If you really want to learn about regular expressions, you’ll need to get Mastering Regular Expressions (Jeffrey Friedl). The book is THE book on regular expressions.If you for some reason don’t want to get the book, a series of 10 videocasts from Zain Naboulsi (Is this thing on) should be your second choice. Besides being well made, it focuses only on .NET, which Mastering Regular Expressions only does partly.